Thanks to my sister, EP, I got a wonderful chocolate recipe and I have been busy in the kitchen aaaaall week long creating some yummy(if I do say so myself) confections! I have made eight batches of chocolate (only six successful ones) and the texture has been spot on! I purchased some Special Dark cocoa powder from Hershey's instead of regular(milk) because I really like dark chocolate! I made my first batch of milk chocolate today and it was a hit! I've also made several batches with coffee in them, and those are absolutely decadent. My latest endevour was raspberry flavored dark chocolate, and it isn't turning out so well. I think because there was so much liquid in it, that it's not firming up the way the others have been. We'll see. Its been fun experimenting! I'll post what I call the "skeleton" recipe below. (And also the recipe for raw sugar solution, which is what I use as my sweetener. The recipe I use comes from the "Skinny Chocolate" recipe by Trim Healthy Mama.
Smooth and melty chocolate:
What you'll need:
1/2 C. measuring cup
1/4 C. measuring cup
Table spoon
metal whisk
small sauce pot
*parchment paper
*small petal pan (I've been using toaster size)
metal soup spoon
*You only need these if you chose to do a sheet of chocolate. I've also been using candy molds. If you have candy molds, use them. I found that a more uniform looking piece of chocolate is more enticing and presentable.
Ingredients:
1/2 C. coconut oil
1/4 C. cocoa powder
3 T. raw sugar solution
1/2 T. vanilla
Flavoring of your choice (I've done coffee, coffee raspberry, and my sister has done toffee flavoring, and caramel.)
1)Melt down the coconut oil in sauce pan. (It melts quickly, so stay right with it.)
2) Remove from heat promptly and wisk in sugar solution, vanilla, and liquid flavoring(this is when I added my coffee concentrate; only about a tablespoon or so. Judge the amounts for yourself, I like mine with more flavor, but found that more liquid alters the texture making it difficult to freeze.)
3) Whisk in cocoa powder. The texture should be liquidy and smooth. If you still have clumps, whisk them out.
4) If you're using candy molds, spoon or pipe(if you have piping bottles) the chocolate mixture in. If you're using a pan, line it with parchment paper and pour the chocolate in. The bigger the pan, the thinner the chocolate. I don't like my too thick, but too thing is just unsatisfying. Again, judge this for your own personal preference.
5) Freeze it. The time depends entirely on the overall texture and thickness of your chocolate. Some of my chocolate has taken as little as 10 minutes to freeze completely, and some has taken upwards of an hour. If they sink at all to touch, or seem tacky with you touch them, keep freezing. If they're still tacky or sticky after an hour, the batch is, sadly, scrapped. I've done this twice now :(
6) Once your chocolate is frozen through, pop it out.
For candy molds:
turn them over, and bang the back of each candy with soup spoon. The should pop out fairly easily; if not try freezing them a tad longer.
For a pan:
Lift the parchment paper out and simply bang the chocolate with the soup spoon. The pieces will be unevenly shaped and sized, but oooo so tasty!
I store my chocolate in Rubbermaid containers in the freezer, but it can also be kept in the fridge. Because of the coconut oil, it needs to be kept cool.
Raw Sugar Solution:
What you'll need:
1 C. measuring cup
Glass 2 C. measuring cup
Ingredients:
1 C. boiling water
1 C. sugar in the raw(found with normal white sugar)
1) Simply put both ingredients in the glass container, and stir with a fork. The sugar won't dissolve completely, so I pop it into the microwave for 1 1/2-2 minutes and the sugar is usually fully dissolved. I keep mine in a Rubbermaid(no...I'm not actually obsessed...) container that has a small pour hole on the lid and store it in the fridge. My sister uses it in cold coffee, my mom uses it in plain yogurt, and I use it in my chocolate. It's a great little sweetener to use!
Hope someone finds this and enjoys it! :)
Showing posts with label pinteresting. Show all posts
Showing posts with label pinteresting. Show all posts
Friday, January 17, 2014
Wednesday, October 23, 2013
Beauty Hacks
Over the past several months, I've gotten creative, hacking and squeezing my way out of expensive products by coming up with ways to do so. Some of these I found on Pinterest, but most of them are (as far as I am aware..) 100% original ideas! :)
Makeup Hacks:
1) Mascara stretching:
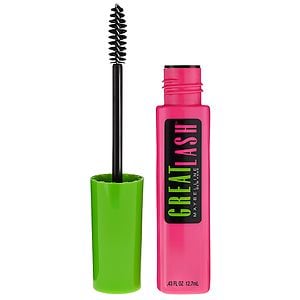 This hack will not be across the board, in-home for everybody. But I wear contacts on occasion, and so I have contact solution on hand. But if you don't typically have it, this one might not be helpful for you. (This is a Pinterest hack)
I did this before my mascara started getting too terribly low, and found that it helped it not dry out at all. But if you do have dry mascara, adding just two drops of contact solution loosens it right now. My mascara would have run out months ago, but it's still perfectly liquidy and doesn't make my eyes burn at all. My mascara has lasted more than twice as long as it normally would, and when it starts to get dry or sticky, I just add a drop or two, and it continues to work perfectly.
2) Flawless foundation:
 I have two different foundation/cover all makeups that I alternate with. One of them is a foaming foundation. I really like this one because it is very light, and doesn't make my face feel caked. The other I use is BB cream. (The one I have right now is by Rimmel and I am not a huge fan..I loved the one from L'Oreal). I became really interested in makeup artistry and watched copious amounts of tutorials on youtube for weeks. Although I do not do makeup art on my face, some of the techniques were applicable to how I applied my makeup, so I began experimenting: applying with a brush. This worked soooo much better with the foam. I just dabbed the brush into the foam, and "painted it" onto my face. The look made my skin look flawless, and I was not getting any of the oils from my fingers onto my face. I then bang the brush out, and go over it with a powder and set it. When it's blended well, it looks good and flawless. I love how my skin looks when I do this way. Since all I have is the Rimmel BB cream, I don't know how this would work with other creams. The Rimmel cream is thick and heavy. It feels and smells like sunscreen (and actually has a higher SPF protection than the other BB creams I've looked at.) I've found that if I just put about a dime sized amount in my palm, and just a few drops of water, it thins it up really well and I can apply it very much the same way I apply the foam. (still like the foam better though.) This makes it feel not as heavy on my face, and has a very similar effect on my face.
3) Makeup remover:
I HATE TAKING MAKEUP OFF. It is one of the biggest drag of womanhood in my mind. Not to be all T.M.I. but I bought some feminine wipes for a missions trip I went on in June, and had a lot left over. YEP. They work perfectly for taking makeup off! Eye makeup too! One wipe does my whole face, and my face doesn't break out after using them. They're gentle and smell nice. I get Walmart brand, which is cheapcheap, and they have 48 wipes to a package. For someone who hardly wears makeup above twice a week, these last for quite a while!
Random Hacks:
I currently only have one for this category, but perhaps in the future I can add to it! :)
Homemade odor-eaters:
I try to take good care of my shoes, so that I feel comfortable taking them off around people, but somehow, that still doesn't happen so well. So I began trying different things I had heard over the years and found fault with all of them. Mom suggested cornstarch, and every time I took a step, I sounded like I was stepping on a duck. I had seen baby powder used for like everything, and tried this as well. But the odor wasn't cut completely, and when I took my shoes off, both of these solutions let me leave a white foot print trail everywhere I went. I also heard that baking soda was a deodorizer, but I found that on it's own it irritated my skin, and was very rough.
I also tried Lysol, dryer sheets, washing them, airing them out. NOTHING seemed to keep the stink out. And as I have found, nothing is worthy of promoting as totally able to work. But I have concocted my own process that seems to be working fairly well. It works best overnight, so do it ahead of time!
Spray the selected shoes with Lysol (the kind in the aerosol can). Get them a little damp, but not soaking. Mix a handful of baby powder and a handful of baking soda. Rub it around on the inside of the shoes; the bottom, top, and sides. If you get your shoes too damp, this becomes like a paste. But don't worry about it, it's ok, just rub it around until most of the inside is well covered. Let the shoes sit overnight. In the morning, they'll be white inside. Bang them out over a trashcan. The white paste is all dried up, and just comes out when the shoes are hit. I've found that I can wear my shoes several times with no stinky issues before needing to do this again.
Hope something was found helpful! :)
Makeup Hacks:
1) Mascara stretching:
This hack will not be across the board, in-home for everybody. But I wear contacts on occasion, and so I have contact solution on hand. But if you don't typically have it, this one might not be helpful for you. (This is a Pinterest hack)I did this before my mascara started getting too terribly low, and found that it helped it not dry out at all. But if you do have dry mascara, adding just two drops of contact solution loosens it right now. My mascara would have run out months ago, but it's still perfectly liquidy and doesn't make my eyes burn at all. My mascara has lasted more than twice as long as it normally would, and when it starts to get dry or sticky, I just add a drop or two, and it continues to work perfectly.
2) Flawless foundation:
I have two different foundation/cover all makeups that I alternate with. One of them is a foaming foundation. I really like this one because it is very light, and doesn't make my face feel caked. The other I use is BB cream. (The one I have right now is by Rimmel and I am not a huge fan..I loved the one from L'Oreal). I became really interested in makeup artistry and watched copious amounts of tutorials on youtube for weeks. Although I do not do makeup art on my face, some of the techniques were applicable to how I applied my makeup, so I began experimenting: applying with a brush. This worked soooo much better with the foam. I just dabbed the brush into the foam, and "painted it" onto my face. The look made my skin look flawless, and I was not getting any of the oils from my fingers onto my face. I then bang the brush out, and go over it with a powder and set it. When it's blended well, it looks good and flawless. I love how my skin looks when I do this way. Since all I have is the Rimmel BB cream, I don't know how this would work with other creams. The Rimmel cream is thick and heavy. It feels and smells like sunscreen (and actually has a higher SPF protection than the other BB creams I've looked at.) I've found that if I just put about a dime sized amount in my palm, and just a few drops of water, it thins it up really well and I can apply it very much the same way I apply the foam. (still like the foam better though.) This makes it feel not as heavy on my face, and has a very similar effect on my face.3) Makeup remover:
I HATE TAKING MAKEUP OFF. It is one of the biggest drag of womanhood in my mind. Not to be all T.M.I. but I bought some feminine wipes for a missions trip I went on in June, and had a lot left over. YEP. They work perfectly for taking makeup off! Eye makeup too! One wipe does my whole face, and my face doesn't break out after using them. They're gentle and smell nice. I get Walmart brand, which is cheapcheap, and they have 48 wipes to a package. For someone who hardly wears makeup above twice a week, these last for quite a while!
Random Hacks:
I currently only have one for this category, but perhaps in the future I can add to it! :)
Homemade odor-eaters:
I try to take good care of my shoes, so that I feel comfortable taking them off around people, but somehow, that still doesn't happen so well. So I began trying different things I had heard over the years and found fault with all of them. Mom suggested cornstarch, and every time I took a step, I sounded like I was stepping on a duck. I had seen baby powder used for like everything, and tried this as well. But the odor wasn't cut completely, and when I took my shoes off, both of these solutions let me leave a white foot print trail everywhere I went. I also heard that baking soda was a deodorizer, but I found that on it's own it irritated my skin, and was very rough.
I also tried Lysol, dryer sheets, washing them, airing them out. NOTHING seemed to keep the stink out. And as I have found, nothing is worthy of promoting as totally able to work. But I have concocted my own process that seems to be working fairly well. It works best overnight, so do it ahead of time!
Spray the selected shoes with Lysol (the kind in the aerosol can). Get them a little damp, but not soaking. Mix a handful of baby powder and a handful of baking soda. Rub it around on the inside of the shoes; the bottom, top, and sides. If you get your shoes too damp, this becomes like a paste. But don't worry about it, it's ok, just rub it around until most of the inside is well covered. Let the shoes sit overnight. In the morning, they'll be white inside. Bang them out over a trashcan. The white paste is all dried up, and just comes out when the shoes are hit. I've found that I can wear my shoes several times with no stinky issues before needing to do this again.
Hope something was found helpful! :)
Subscribe to:
Posts (Atom)